Laravel package to perform sentiment analysis

Standard

I have just released a Laravel package that allows you to perform a sentiment analysis over an English sentence. This is basically a Laravel wrapper for phpInsight, written by JWHennessey.

Features overview

After registering the service provider and the alias in your app/config/app.php file, it will be super easy to use! Here is a little overview of the available functions:

SentimentAnalysis::isNegative("Weather today is rubbish"); // Returns true
SentimentAnalysis::decision("Weather today is rubbish"); // Returns 'negative'
SentimentAnalysis::score("Weather today is rubbish"); // Returns 0.5. We are pretty confident that it is a negative sentence

SentimentAnalysis::isPositive("Marie was enthusiastic about the upcoming trip. Her brother was also passionate about her leaving - he would finally have the house for himself."); // Returns true

Documentation and download

Of course the package is available via Composer. The full documentation can be found on GitHub : github.com/AntoineAugusti/laravel-sentiment-analysis.

Do not hesitate to open up an issue if something is not working as expected. Pull-requests are very welcome also!

Inlining CSS when sending an email with Mailgun in Laravel

Standard

Since Laravel 4.2, it is possible to use external emails providers to send emails in your application: Mailgun and Mandrill. Before that I was using a nice plugin fedeisas/laravel-mail-css-inliner to inline CSS just before sending the email. Thanks to this, my views are very clean and my emails are still displayed properly in the various email clients and webmails. This plugin was taking advantage of SwiftMailer to inline the CSS when sending an email by registering a plugin. Unfortunately, it is not working with external providers because SwiftMailer is not used since an API call is made instead.

Extending some classes to fix this

I really wanted to inline my CSS before sending an email and I wanted a clean way to do this. A workaround that I have figured out is to extend two classes: Illuminate\Mail\MailServiceProvider and Illuminate\Mail\Transport\MailgunTransport.

I’ve created a new file located at app/lib/TeenQuotes/Mail/Transport/MailgunTransport.php. The goal was to edit the message before calling the Mailgun API.

namespace TeenQuotes\Mail\Transport;

use Swift_Transport;
use Swift_Mime_Message;
use GuzzleHttp\Post\PostFile;
use Swift_Events_EventListener;
use TijsVerkoyen\CssToInlineStyles\CssToInlineStyles;

class MailgunTransport extends \Illuminate\Mail\Transport\MailgunTransport {

	/**
	 * {@inheritdoc}
	 */
	public function send(Swift_Mime_Message $message, &$failedRecipients = null)
	{
		$client = $this->getHttpClient();

		// Inline CSS here
		$converter = new CssToInlineStyles();
		$converter->setEncoding($message->getCharset());
		$converter->setUseInlineStylesBlock();
		$converter->setCleanup();

		if ($message->getContentType() === 'text/html' ||
			($message->getContentType() === 'multipart/alternative' && $message->getBody())
		) {
			$converter->setHTML($message->getBody());
			$message->setBody($converter->convert());
		}

		foreach ($message->getChildren() as $part) {
			if (strpos($part->getContentType(), 'text/html') === 0) {
				$converter->setHTML($part->getBody());
				$part->setBody($converter->convert());
			}
		}

		// Call the API
		$client->post($this->url, ['auth' => ['api', $this->key],
			'body' => [
				'to' => $this->getTo($message),
				'message' => new PostFile('message', (string) $message),
			],
		]);
	}
}

Since we have a new MailgunTransport, we need to use our custom MailgunTransport when sending an email. I have created a new file at app/lib/TeenQuotes/Mail/MailServiceProvider.php.

namespace TeenQuotes\Mail;

use TeenQuotes\Mail\Transport\MailgunTransport;

class MailServiceProvider extends \Illuminate\Mail\MailServiceProvider {

	/**
	 * Register the Mailgun Swift Transport instance.
	 *
	 * @param  array  $config
	 * @return void
	 */
	protected function registerMailgunTransport($config)
	{
		$mailgun = $this->app['config']->get('services.mailgun', array());

		$this->app->bindShared('swift.transport', function() use ($mailgun)
		{
			return new MailgunTransport($mailgun['secret'], $mailgun['domain']);
		});
	}
}

Not so much work, I just use my custom MailgunTransport that I have just created.

Replacing the Mail Provider

You need to update providers in app/config/app.php to replace the MailServiceProvider with our custom provider.

	'providers' => array(

		// Some others providers...
		'Illuminate\Log\LogServiceProvider',
		// Comment this 'Illuminate\Mail\MailServiceProvider', 
		// We add our new MailServiceProvider
		'TeenQuotes\Mail\MailServiceProvider',
		// Some more providers...
	),

Updating composer.json

We need some new plugins

	"require": {
		// Your plugins
		"tijsverkoyen/css-to-inline-styles": "1.2.*",
		"guzzlehttp/guzzle": "~4.0"
	},

And we need to update the autoload section to be able to load our custom library

	"autoload": {
		"classmap": [
			"app/commands",
			"app/controllers",
			"app/models",
			"app/database/migrations",
			"app/database/seeds",
			"app/exceptions.php",
			"app/tests/TestCase.php"
		],
		"psr-0": {
			"TeenQuotes": "app/lib"
		}
	},

A simple composer dump-autoload and you will be good! Do not forget to set your API key and your mail domain for Mailgun in app/config/services.php.

If you want to use a different namespace of course you are free!

Laravel: fulltext selection and ordering

Standard

Yesterday I was looking for a way to do a FULLTEXT select using Laravel. It was not so easy. In this article I’m going to explain how to a FULLTEXT select and to order by this selection.

The migration

If you want to do a FULLTEXT search, you will need a FULLTEXT index on at least one column of your table. Warning: if you are using InnoDB as your table’s engine, you will need MySQL >= 5.6. If you are using MyISAM as your table’s engine, you are good to go for the index but you can’t use foreign keys.

I’m using InnoDB with MySQL 5.6, here is my code for the migration of the table.

use Illuminate\Database\Migrations\Migration;
use Illuminate\Database\Schema\Blueprint;

class CreateQuotesTable extends Migration {

    /**
     * Run the migrations.
     *
     * @return void
     */
    public function up()
    {
        Schema::dropIfExists('quotes');

        Schema::create('quotes', function(Blueprint $table) {
            $table->engine = "InnoDB";
            $table->increments('id');
            $table->string('content', 500);
            $table->integer('user_id')->unsigned()->index();
            $table->foreign('user_id')->references('id')->on('users')->onDelete('cascade');
            $table->tinyInteger('approved')->default(0);
            $table->timestamps();
        });

        // Here we create the FULLTEXT index
        DB::statement('ALTER TABLE quotes ADD FULLTEXT search(content)');
    }

    /**
     * Reverse the migrations.
     *
     * @return void
     */
    public function down()
    {
        // Drop the index before dropping the table
        Schema::table('quotes', function($table) {
            $table->dropIndex('search');
        });
        Schema::drop('quotes');
    }

}

Nothing uncommon, note that you will have to use a DB::statement('ALTER TABLE quotes ADD FULLTEXT search(content)') to create the index.

Searching using the FULLTEXT index

Here it comes the fun part. Now that we have your index, let’s begin to use it. I want to get quotes based on a search on their content. I want pertinent results so I’ll advantage of the index.

My code is the following:

/**
 * @brief Function used to search for quotes using the FULLTEXT index on content
 *
 * @param  string $search Our search query
 * @return Collection Collection of Quote
 */
public static function searchQuotes($search)
{
    return Quote::
    select('id', 'content', 'user_id', 'approved', 'created_at', 'updated_at', DB::raw("MATCH(content) AGAINST(?) AS `rank`"))
    // $search will NOT be bind here
    // it will be bind when calling setBindings
    ->whereRaw("MATCH(content) AGAINST(?)", array($search))
    // I want to keep only published quotes
    ->where('approved', '=', 1)
    // Order by the rank column we got with our FULLTEXT index
    ->orderBy('rank', 'DESC')
    // Bind variables here
    // We really need to bind ALL variables here
    // question marks will be replaced in the query
    ->setBindings([$search, $search, 1])
    ->get();
}

I haven’t found a convenient way to select all columns from my table plus an additional one: the rank given by the FULLTEXT search. The tricky part here is really the binding. You need to bind all variables at the end of your query to make it work.

I’m not using the FULLTEXT search in BOOLEAN MODE here. If you need to do so, take a look at the official documentation: http://dev.mysql.com/doc/refman/5.0/en/fulltext-boolean.html. You will only need to add two strings to make it work.

Paginate posts correctly when they are random ordered

Standard

The problem

This is a common problem: you have entities in a category, you want to display them by pages because you have a lot of entities and you don’t want to have entities from page 1 in your page 2.

If you are using the ORDER BY RAND() function from MySQL, you will have a problem. MySQL splits up the data into pages of X posts each (paginates) and fails to include a new set of X posts on page 2 and so forth. In other words, because it is listing things in a random order, it just goes out and gets another X random posts. As a result, you will have some repeated posts instead of a new set of X random posts on page 2, etc.

The solution

Fortunately, there is a solution for this problem. You will be able to “remember” which random 10 posts were included on page 1, and then have a new set of 10 posts to put on pages 2, 3, etc. until all posts are displayed.

The MySQL RAND() function accepts a seed as an optional argument. Using a seed, it will return the same randomized result set each time. For example, if you want your posts to be random ordered, paginated with no repetition, you can write a query like this: SELECT * FROM posts ORDER BY RAND(42) to select posts.

If you do not want to have the same results for every user viewing the list, do not give an arbitrary value to the RAND function: generate a random number, store it in session and pass it to the MySQL RAND function when selecting posts.

You don’t write code for machines

Standard
double m[]= {7709179928849219.0, 771};
int main()
{
    m[1]--?m[0]*=2,main():printf((char*)m);    
}

You know what these lines print? They print C++Sucks.

Yes, really, you can give it a try if you want. If you want the explanation you can check this question on StackOverflow.

My point is that you don’t write code for machines. If you are happy when your code compiles or when it runs and prints what you expected, you are a fool. Of course it’s a success when your code does what you wanted to do, but this is the most basic thing you can expect from it.

Programming is difficult. Reading others people’s code is even more difficult. And yet you are going to do it everyday. So the next time you are going to write some code, or contribute to some code, keep in mind that your ultimate goal is not to make it work, but to write it in a way that should be understandable by other smart folks.

Laravel : calling your own API

Standard

If you are using Laravel to develop PHP websites (you should if you are not using it!) you will usually create your own API. If you create an API, most of the time it is because you will need to call this API from outside your website. But sometimes you want to call your API from your website. And it’s not always easy to call your own API. Let’s see a few common mistakes (it took me 1 hour to figure this out) and how to solve them.

Calling your API with no parameters

No problem here, you can use the following code:

$request = Request::create('/api/page/'.$idPage, 'GET');
$instance = json_decode(Route::dispatch($request)->getContent());

Calling your API with parameters

This is where it gets tricky. Imagine you want to call the following URL:

http://example.com/api/page/1?section=howto

If you change the previous code with something like that:

$request = Request::create('/api/page/'.$idPage.'?section=howto', 'GET');
$instance = json_decode(Route::dispatch($request)->getContent());

And if you try to do something like this in your API:

public function show(Page $page)
{
     if (Input::has('section'))
     {
          // code
     }
 }

You will not be able to get the section parameter in your API controller with Input::has('section').

But why?

In fact Input is actually referencing the current request and not your newly created request. Your input will be available on the request instance itself that you instantiate with Request::create(). If you are using Illuminate\Http\Request in your API, then you can use $request->input('key') or $request->query('key') to get parameters from the query string. But you have a problem if you are using the Input facade in your API.

A solution (so that you can continue using the Input facade) is to replace the input on the current request, then switch it back.

// Store the original input of the request
$originalInput = Request::input();

// Create your request to your API
$request = Request::create('/api/page/'.$idPage.'?section=howto', 'GET');
// Replace the input with your request instance input
Request::replace($request->input());

// Dispatch your request instance with the router
$response = Route::dispatch($request);

// Fetch the response
$instance = json_decode(Route::dispatch($request)->getContent());

// Replace the input again with the original request input.
Request::replace($originalInput);

With this you will be able to use your original request input before and after your internal API request. The Input facade in your API will be able to fetch the right parameters.

Proper internal requests

You have seen how to make internal requests to your API, but the code is not so beautiful. If you are making only a request sometimes, it is okay to use the previous example. But if you need to do several requests to your API, you will need a cleaner code.

There is a plugin for that: Laravel HMVC, available on GitHub. With it, you will not need to replace the input for your requests to your API. You will be able to do something like that:

// GET Request.
API::get('user/1');

// POST Request.
API::post('user', array('title' => 'Demo'));

// PUT Request.
API::put('user/1', array('title' => 'Changed'));

Convenient isn’t it? You can add it to your composer.json file:

"teepluss/api": "dev-master"

HTTP error when uploading an image in WordPress

Standard

This morning I came across a problem when trying to upload an image to my WordPress blog. This error just said “HTTP error”. I noticed that if I tried to upload a very small image (< = 100 kb), everything was fine. After some Google queries (and a lot of things that said you should put this in .htaccess), I fixed this issue.

Origin of the problem

The problem was caused by FastCGI. When using PHP as FastCGI, if you try to upload a file larger than 128 kb, an error “mod_fcgid: HTTP request length XXXX (so far) exceeds MaxRequestLen (131072)” occurs and causes a 500 internal server error. This happens because the value of MaxRequestLen directive is set to 131072 bytes (128 kb) by default.

Correction of the problem

To fix this, you should change the MaxRequestLen directive from the file fcgid.conf. Locate this file:

$ locate fcgid.conf

It’s usually located at edit /etc/httpd/conf.d/fcgid.conf or /etc/apache2/mods-available/fcgid.conf and add (or replace this line):

MaxRequestLen 15728640

With this, the MaxRequestLen will be 15 MB. Restart your web server and you should be fine!

$ sudo service apache2 restart

Providing a simple 2-step authentication for your app with Google Authenticator

Standard

In this article I will show how simple is it to code in PHP a 2-step authentication for your application thanks to the Google Authenticator application for your smartphone.

Requirements

You will need Composer for your computer and the Google Authenticator application on your smartphone.

Coding

Let’s start! Create an empty directory, and put this simple composer file inside.
Open a terminal in the directory you just created and run
Now you have the famous vendor directory with the package that we need. You can view it on GitHub here: https://github.com/mauroveron/laravel-google-authenticator.

Let’s create our main file. We are not going to code a entire connection system, I will just show you how you can code a 2-step authentication system. The user will have to download the Google Authenticator application, scan a barcode and then he will have a 6 digits code every 30 seconds from the application. You will ask for this code if he has previously entered his password successfully.

Put this file in the same directory.

If you want to test this code, run this command from your terminal:

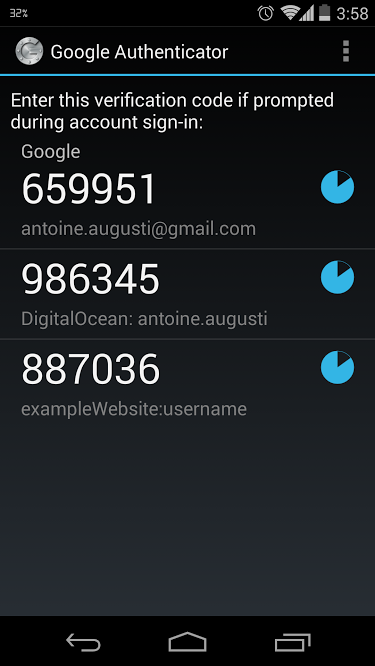
Open your browser, go to http://localhost:8080, scan the barcode from the Google Authenticator application and refresh the page. The current code (given by the website) should follow what is written on your phone. You should have something like this in your Google Authenticator app.

Conclusion

And… That’s it! You know how to generate a secret key for a user, the barcode associated with it and you have a function to check if the user has entered the right code. Of course you will have some work to do if you want to implement it into your website: you will have to explain to your users how to install the app, how to scan the barcode, to save their secret key in your users table and add a step to your login process.

But it’s not so difficult 🙂

Spell check for a specific file extension in Sublime Text

Standard

I’m a big fan of Sublime Text. I always write documents using LaTeX and Sublime Text. I know how to write in almost a perfect French, but everybody can do a spelling mistake sometimes. I was tired to enable “Spell check” and to select the french dictionary everytime I had to open a .tex file. So I asked myself:

Is there a way to always enable spell check with a french dictionnary for every .tex file I open?

The answer is yes! Here is how to do it.

Open a .tex file. Go to Preferences -> Settings – More -> Syntax Specific – User and put this inside:

Do not forget to change the location of your dictionary! Save this file and start typing without making mistakes 😉

Adding dictionaries

Additional dictionaries can be found on the Sublime Text Github’s repository here: https://github.com/SublimeText/Dictionaries. If you want a new language, create a new package (that is to say a folder), and put language.dic and language.aff inside this folder. You will be able to select this language after that.

A Good User Interface

Standard

A good user interface is crucial. It will make your users happy and it will bring you high conversion rates.

goodui.org is a website where you will find many good ideas to improve your user interface. Maybe you should give it a try 🙂