Paginate posts correctly when they are random ordered

Standard

The problem

This is a common problem: you have entities in a category, you want to display them by pages because you have a lot of entities and you don’t want to have entities from page 1 in your page 2.

If you are using the ORDER BY RAND() function from MySQL, you will have a problem. MySQL splits up the data into pages of X posts each (paginates) and fails to include a new set of X posts on page 2 and so forth. In other words, because it is listing things in a random order, it just goes out and gets another X random posts. As a result, you will have some repeated posts instead of a new set of X random posts on page 2, etc.

The solution

Fortunately, there is a solution for this problem. You will be able to “remember” which random 10 posts were included on page 1, and then have a new set of 10 posts to put on pages 2, 3, etc. until all posts are displayed.

The MySQL RAND() function accepts a seed as an optional argument. Using a seed, it will return the same randomized result set each time. For example, if you want your posts to be random ordered, paginated with no repetition, you can write a query like this: SELECT * FROM posts ORDER BY RAND(42) to select posts.

If you do not want to have the same results for every user viewing the list, do not give an arbitrary value to the RAND function: generate a random number, store it in session and pass it to the MySQL RAND function when selecting posts.

You don’t write code for machines

Standard
double m[]= {7709179928849219.0, 771};
int main()
{
    m[1]--?m[0]*=2,main():printf((char*)m);    
}

You know what these lines print? They print C++Sucks.

Yes, really, you can give it a try if you want. If you want the explanation you can check this question on StackOverflow.

My point is that you don’t write code for machines. If you are happy when your code compiles or when it runs and prints what you expected, you are a fool. Of course it’s a success when your code does what you wanted to do, but this is the most basic thing you can expect from it.

Programming is difficult. Reading others people’s code is even more difficult. And yet you are going to do it everyday. So the next time you are going to write some code, or contribute to some code, keep in mind that your ultimate goal is not to make it work, but to write it in a way that should be understandable by other smart folks.

Laravel : calling your own API

Standard

If you are using Laravel to develop PHP websites (you should if you are not using it!) you will usually create your own API. If you create an API, most of the time it is because you will need to call this API from outside your website. But sometimes you want to call your API from your website. And it’s not always easy to call your own API. Let’s see a few common mistakes (it took me 1 hour to figure this out) and how to solve them.

Calling your API with no parameters

No problem here, you can use the following code:

$request = Request::create('/api/page/'.$idPage, 'GET');
$instance = json_decode(Route::dispatch($request)->getContent());

Calling your API with parameters

This is where it gets tricky. Imagine you want to call the following URL:

http://example.com/api/page/1?section=howto

If you change the previous code with something like that:

$request = Request::create('/api/page/'.$idPage.'?section=howto', 'GET');
$instance = json_decode(Route::dispatch($request)->getContent());

And if you try to do something like this in your API:

public function show(Page $page)
{
     if (Input::has('section'))
     {
          // code
     }
 }

You will not be able to get the section parameter in your API controller with Input::has('section').

But why?

In fact Input is actually referencing the current request and not your newly created request. Your input will be available on the request instance itself that you instantiate with Request::create(). If you are using Illuminate\Http\Request in your API, then you can use $request->input('key') or $request->query('key') to get parameters from the query string. But you have a problem if you are using the Input facade in your API.

A solution (so that you can continue using the Input facade) is to replace the input on the current request, then switch it back.

// Store the original input of the request
$originalInput = Request::input();

// Create your request to your API
$request = Request::create('/api/page/'.$idPage.'?section=howto', 'GET');
// Replace the input with your request instance input
Request::replace($request->input());

// Dispatch your request instance with the router
$response = Route::dispatch($request);

// Fetch the response
$instance = json_decode(Route::dispatch($request)->getContent());

// Replace the input again with the original request input.
Request::replace($originalInput);

With this you will be able to use your original request input before and after your internal API request. The Input facade in your API will be able to fetch the right parameters.

Proper internal requests

You have seen how to make internal requests to your API, but the code is not so beautiful. If you are making only a request sometimes, it is okay to use the previous example. But if you need to do several requests to your API, you will need a cleaner code.

There is a plugin for that: Laravel HMVC, available on GitHub. With it, you will not need to replace the input for your requests to your API. You will be able to do something like that:

// GET Request.
API::get('user/1');

// POST Request.
API::post('user', array('title' => 'Demo'));

// PUT Request.
API::put('user/1', array('title' => 'Changed'));

Convenient isn’t it? You can add it to your composer.json file:

"teepluss/api": "dev-master"

HTTP error when uploading an image in WordPress

Standard

This morning I came across a problem when trying to upload an image to my WordPress blog. This error just said “HTTP error”. I noticed that if I tried to upload a very small image (< = 100 kb), everything was fine. After some Google queries (and a lot of things that said you should put this in .htaccess), I fixed this issue.

Origin of the problem

The problem was caused by FastCGI. When using PHP as FastCGI, if you try to upload a file larger than 128 kb, an error “mod_fcgid: HTTP request length XXXX (so far) exceeds MaxRequestLen (131072)” occurs and causes a 500 internal server error. This happens because the value of MaxRequestLen directive is set to 131072 bytes (128 kb) by default.

Correction of the problem

To fix this, you should change the MaxRequestLen directive from the file fcgid.conf. Locate this file:

$ locate fcgid.conf

It’s usually located at edit /etc/httpd/conf.d/fcgid.conf or /etc/apache2/mods-available/fcgid.conf and add (or replace this line):

MaxRequestLen 15728640

With this, the MaxRequestLen will be 15 MB. Restart your web server and you should be fine!

$ sudo service apache2 restart

Providing a simple 2-step authentication for your app with Google Authenticator

Standard

In this article I will show how simple is it to code in PHP a 2-step authentication for your application thanks to the Google Authenticator application for your smartphone.

Requirements

You will need Composer for your computer and the Google Authenticator application on your smartphone.

Coding

Let’s start! Create an empty directory, and put this simple composer file inside.
Open a terminal in the directory you just created and run
Now you have the famous vendor directory with the package that we need. You can view it on GitHub here: https://github.com/mauroveron/laravel-google-authenticator.

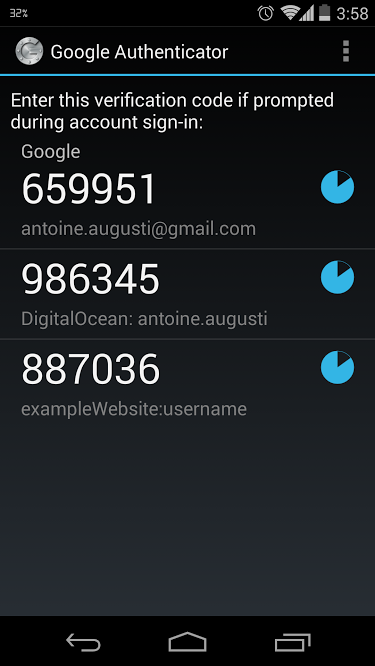
Let’s create our main file. We are not going to code a entire connection system, I will just show you how you can code a 2-step authentication system. The user will have to download the Google Authenticator application, scan a barcode and then he will have a 6 digits code every 30 seconds from the application. You will ask for this code if he has previously entered his password successfully.

Put this file in the same directory.

If you want to test this code, run this command from your terminal:

Open your browser, go to http://localhost:8080, scan the barcode from the Google Authenticator application and refresh the page. The current code (given by the website) should follow what is written on your phone. You should have something like this in your Google Authenticator app.

Conclusion

And… That’s it! You know how to generate a secret key for a user, the barcode associated with it and you have a function to check if the user has entered the right code. Of course you will have some work to do if you want to implement it into your website: you will have to explain to your users how to install the app, how to scan the barcode, to save their secret key in your users table and add a step to your login process.

But it’s not so difficult 🙂

Spell check for a specific file extension in Sublime Text

Standard

I’m a big fan of Sublime Text. I always write documents using LaTeX and Sublime Text. I know how to write in almost a perfect French, but everybody can do a spelling mistake sometimes. I was tired to enable “Spell check” and to select the french dictionary everytime I had to open a .tex file. So I asked myself:

Is there a way to always enable spell check with a french dictionnary for every .tex file I open?

The answer is yes! Here is how to do it.

Open a .tex file. Go to Preferences -> Settings – More -> Syntax Specific – User and put this inside:

Do not forget to change the location of your dictionary! Save this file and start typing without making mistakes 😉

Adding dictionaries

Additional dictionaries can be found on the Sublime Text Github’s repository here: https://github.com/SublimeText/Dictionaries. If you want a new language, create a new package (that is to say a folder), and put language.dic and language.aff inside this folder. You will be able to select this language after that.

EasyPHPCharts

Standard

Area Chart
Last week I released on GitHub a quite simple PHP class to easily build beautiful charts from www.chartjs.org. The source code can be found on GitHub here: github.com/AntoineAugusti/EasyPHPCharts. Do not hesitate to submit a pull request if you found a bug or a typo in my code. I’m quite sure that the code isn’t perfect yet.

A documentation can be found at GitHub Pages : antoineaugusti.github.io/EasyPHPCharts/. If you consider that the documentation is not detailed enough, please e-mail me! If you want to implement new features, please take a loot at the ChartJS Documentation : www.chartjs.org/docs/.

I hope you’ll be able to draw beautiful charts 🙂

Using Google Apps Script: an example with Gmail

Standard

Google Apps Script. Wait…what?

A few months earlier, I discovered Google Apps Script and decided to play with it. Google Apps Script allows you to interact with many Google products (Gmail, Documents, Finance, Maps, Calendar) by writing some code for these apps. The amazing point is that the documentation for Google Apps Script is just awesome. I’ll write it again because it really is: it’s awesome. The documentation is really well written and the Google team provide useful (and so much powerful!) functions. And last but not least, it’s beautiful. Amazing.

An example with Gmail

Once again, a few months ago, I saw on Twitter that a guy was complaining about his Gmail Inbox. This guy received a lot of emails everyday (he said more than 300 if I remember well) and hadn’t enough time to read them all. So he asked on Twitter, “Is there a way to tell people that I just want to read short emails?” and someone gave him just a little script to do so. This script used Google Apps Script and especially the GmailApp class. You can read the documentation of this class here: developers.google.com/apps-script/reference/gmail/gmail-app.

I was excited about that: the code was really beautiful, simple and powerful. So I decided to rewrite it by myself, just to try writing my very first Google Apps Script. Enough talk, here is the code!

Okay, seems cool. How to use it?

Well, my goal was just to show how awesome Google Apps Script could be. I don’t think that you want to use this script for your personal use (unless you’re a very popular person!). But if you still want to use it for you, just go to script.google.com, create a new file, copy and paste the code and try executing it. Google will ask your approval before you’ll be able to interact with Gmail thanks to this code (thanks Google for this security).

Test it, and once you’ll like the way it works, run periodically this code (e.g. every 5 minutes) with a timer by selecting “Resources” > “Current project’s triggers…” in Google Script. Your Inbox will always be super clean 😉

Ressources

Your bible, the documentation for Google Apps Script: developers.google.com/apps-script/.

Suivre des clics à l’aide de Google Analytics

Standard

Google Analytics
Google Analytics est un puissant outil d’analyse des visites sur un site web. Si vous ne l’utilisez pas encore, je vous le recommande vivement : les données fournies par Google Analytics vous seront extrêmement utiles.

Dans quel cas utiliser des événements ?

Une fonctionnalité avancée de Google Analytics qui est très intéressante à utiliser est celle de la gestion des événements. Je ne suis néanmoins pas encore un expert avec cette fonctionnalité, c’est pourquoi je vous présenterai seulement la gestion des événements provenant d’un clic d’un utilisateur. Imaginons : vous avez un site avec une page d’inscription. Vous avez un lien vers cette page dans votre menu, un autre dans un article de votre blog et un dernier dans votre footer. Quel lien est le plus cliqué ? Si vous faites un changement de design dans votre footer, le lien dans le footer sera-t-il cliqué plus souvent ?

La gestion des événements proposé par Google Analytics va vous permettre d’avoir des réponses à ces questions.

La fonction _trackEvent()

Pour la suite, vous devez utiliser Google Analytics et avoir le code de Google Analytics présent sur toutes les pages de votre site. Nous allons utiliser la fonctionnalité _trackEvent pour pouvoir suivre les événements (ici les clics) sur votre site.
La fonctionnalité _trackEvent prend les arguments suivants :

Voici une description de chacun des paramètres :

  • category : string. La catégorie générale de votre événement (par exemple “Page d’inscription”).
  • action : string. L’action pour cet événement (par exemple “Clic”).
  • opt_label : string. La description de cet événement (par exemple “Lien footer”).
  • opt_value : int. Dans notre cas, on n’utilisera pas ce paramètre. On l’utilise dans des cas bien précis, quand on a besoin d’une valeur numérique associée à un événement. Par exemple, dans le cas d’une vidéo, la durée de la lecture jusqu’à ce que l’utilisateur clique sur “Pause” par exemple.
  • opt_noninteraction : boolean. La valeur par défaut est false. Si la valeur est à true, le fait de déclencher cet événement ne sera pas compté comme une interaction. Si vous laissez à false, le déclenchement de cet événement sera bien compté comme une action, et votre utilisateur ne sera donc pas compté dans le taux de rebond (bounce rate).

Mise en place

Maintenant que vous savez comment utiliser la fonction _trackEvent, il faut l’implémenter dans votre code. Voici par exemple ce qu’il faudra écrire dans votre code si je reprends l’exemple initial avec des liens vers une page d’inscription placés à différents endroits.

Vous voyez que peu de choses varient. En effet, la catégorie doit rester la même pour comprendre de quel événement je peux parler, l’action est la même (toujours un clic), seul le label varie selon la localisation du lien. Dans cet exemple, pas besoin d’opt_value et je ne me suis pas soucié de mon taux de rebond sur ces pages.

Où retrouver ces statistiques ?

Une fois votre code mis à jour, vous pouvez retrouver les statistiques de vos événements dans l’onglet “Contenu” puis dans “Événements”. Cliquez ensuite sur le nom de la catégorie de votre événement, puis sur “Libellé d’événement” pour voir la répartition des événements au sein de votre catégorie.

Voici un exemple de résultat qui provient de Teen Quotes :
Google Analytics

Vous voilà en possession de statistiques intéressantes. À vous maintenant de les exploiter au mieux !

Pour aller plus loin, l’aide Google à propos de l’event tracking (en anglais) : dev.google.com/analytics/devguides/collection/gajs/methods/gaJSApiEventTracking.
Conserver les sessions dans les sous-domaines en PHP

Standard

Par défaut, PHP utilise le cookie PHPSESSID pour propager les sessions à travers les différentes pages d’un site. Par défaut, PHP utilise le domaine et le sous-domaine courant pour déclarer ce cookie.

Par exemple, si je me connecte sur www.monsupersite.com, mon cookie PHPSESSID sera déclaré pour la localisation www.monsupersite.com. Les données contenues dans la session ne pourront pas voyager avec le visiteur pour un autre domaine ou sous-domaine. Ceci veut dire que mes données $_SESSION ne seront malheureusement pas accessibles sur forum.monsupersite.com par exemple !

Pour rendre les données de la session accessibles sur tous les sous-domaines de votre domaine principal, il va falloir rajouter une ligne au tout début de tous vos fichiers où une session est susceptible d’être créée. Le plus sage étant encore de l’inclure sur toutes vos pages, immédiatement après l’ouverture de la balise PHP. Il suffit de rajouter ceci :

Ceci aura pour effet de supprimer le sous-domaine. Par exemple forum.monsupersite.com devient .monsupersite.com. Ainsi, toutes les données de la session seront accessibles sur tous les sous-domaines de monsupersite.com !